LFOs
There are four Low Frequency Oscillators (LFOs). They do not create any sound on their own but are used to automate and drive the values of other controls in the synth.
For example, if you drag the icon in the LFO tab to the filter cutoff knob, the cutoff will be controlled by the LFO, causing its value to rise and fall according to the LFO speed and shape.
Common controls
LFO Trigger Mode Dropdown

This lets you change how the Lfo behaves, and whether it gets triggered when playing notes, or is left to run independently of the notes played.
- Per voice LFO
Each note triggers it's own LFO which runs while the note is playing. - Envelope
Each note triggers it's own LFO that doesn't repeat - so behaves like an envelope. - Global Free
One Global LFO, unaffected by note on triggers. - Global Resuming
One Global LFO, plays while keys are down. Playing new notes resumes it from the last position it was left at. - Global Trigger
First note starts LFO, which plays until no notes are held. - Global Multi-Trigger
Each note restarts the Global LFO.
LFO Mode Switch

Determines how the LFO behaves, switching between one of four modes (described in more detail below):
- Basic Shapes LFO
- Bezier Curve LFO
- Pattern LFO
- Sample and Hold LFO
Invert Switch

Inverts the output of the LFO. For ramps, this has the effect of ramping the other way.
Rate knob
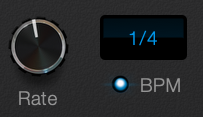
All LFO types use the same rate knob. This can be set to BPM sync if desired. Click the small value screen for more options.
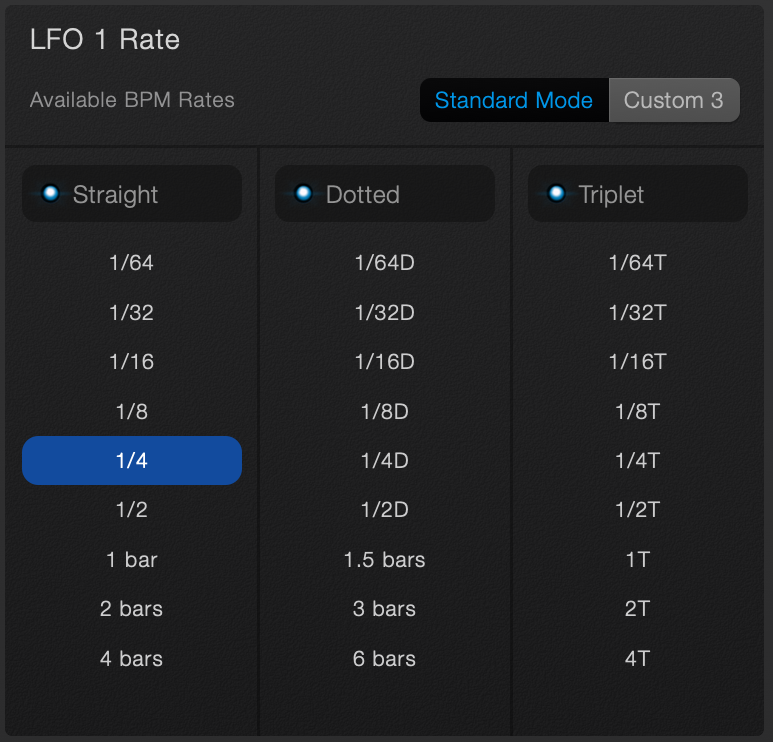
You can choose to allow triplet or dotted times, or restrict the times to three chosen options. This is useful when modulating the rate, where you can have it switch between 8ths and 16ths for instance without using other values.
LFO Screen context menu
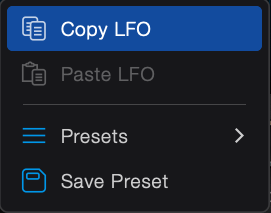
All LFO types have a context menu in the top right of the screen.
- You can copy and paste LFO settings from one LFO to another
- You can load and save LFO presets
Basic Shapes LFO

This is the LFO to use when you just want a simple LFO that moves up and down.
- Shape A or B selectors
Choose Sine, Saw, Square or Triangle - A / B amount knob
Lets you choose a blend of shape A or B to create new combination shapes - Center Knob
Warps the middle of the curve left or right. You can also drag the screen. - Phase Knob
Adjusts the start position of the waveform
Bezier Curve LFO

In this LFO, you can create custom shapes by dragging handles on the screen.
- Double click to add a new point
- Drag the hollow mid point handles to alter the curve shape between two points
- Snap Enable Button
When enabled, points draged near a grid line will snap on to the line - Grid combo box
Choose how many grid lines appear on the screen - Swing Knob
Adjusts every 2nd grid line forwards or backwards in time - Rand button
Randomly adjusts the Y values for the current set of points
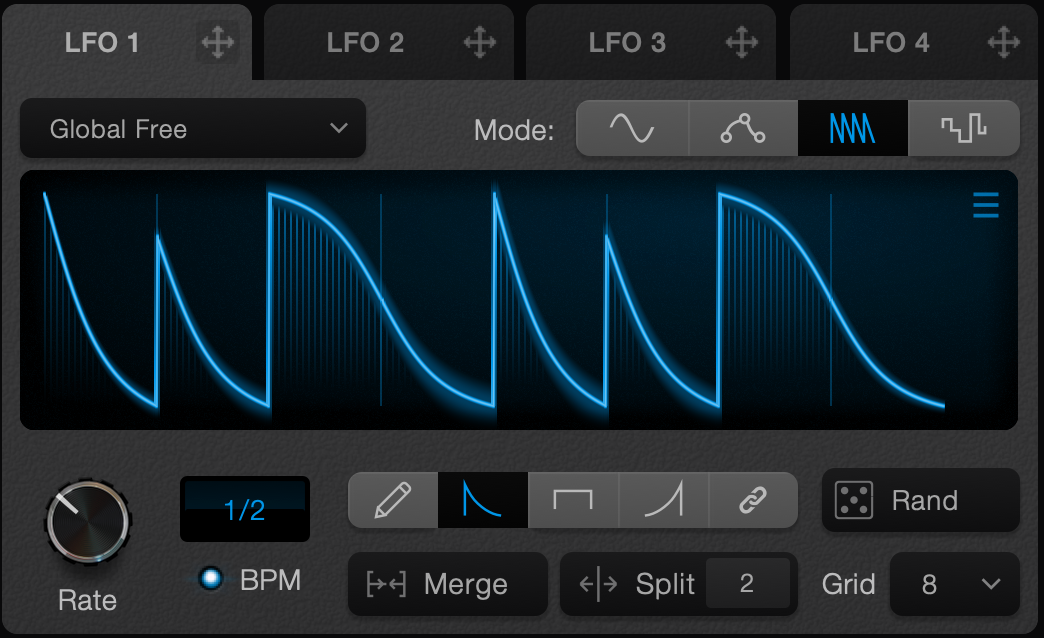
Pattern LFO

In Pattern Mode, the Screen is divided into a number of slots in a grid.
Paint modes
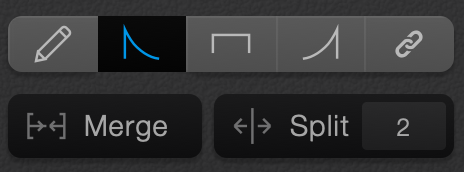
There are various tools for adjusting the curve in the grid.
- Pen mode
Drag the start and end of the slot to adjust the curve vertically. Drag the center of the slot to change the roundness of the line between the start and end. - Ramp Down
Drag the mouse to create small shark tooth shapes. - Flat tool
Drag the mouse to create flat lines at various heights in the grid - Ramp up
Drag the mouse to create small shark tooth shapes. - Linked mode
Adjusting the start or end of a slot also will the value of the slot next to it, creating a continuous curve. You can also adjust the shape of the curve by dragging vertically in the center of a slot. - Merge
In this mode, clicking on the screen will merge two slots in the grid.
Holding alt or option will allow you to merge from any paint mode. - Split into 2
In this mode, clicking a slot on the screen will split it into two parts.
Holding command will allow you to split from any paint mode.
You can also choose to split into 2, 3, 5 or 7 slots by clicking the number at the right of the split button.

- Rand button
Will randomly paint, split or merge slots, depending on the currently selected tool. - Grid Dropdown menu
Will split the grid into an even number of parts. In this case, 8 slots.
Sample and Hold LFO

This LFO creates random shapes. At an interval determined by the rate, a random value is set. If very slow LFO values are chosen, it might seem like this LFO is not doing anything! Try setting to 1/16th to see how it works.
- Set Level from Dropdown Menu
Selects how the next value is chosen when the interval has passed. This is random by default, but you can change it to use another mod source. For instance, if you used an Envelope as the source, The Sample and Hold LFO will use the values of the envelope to set the y values on the axis, while still using the rate, steps, and smooth values of the Sample and Hold LFO. - Mod drop area
You can drop a modulation onto the dropdown to set it as the source. - Steps knob
Determines how many values in the y axis the randomizer gets to choose from. If there are only two steps, the values will be minimum and maximum only. - Smooth knob
When values other than zero are chosen, the line will gradually move to the next chosen value rather than jumping.
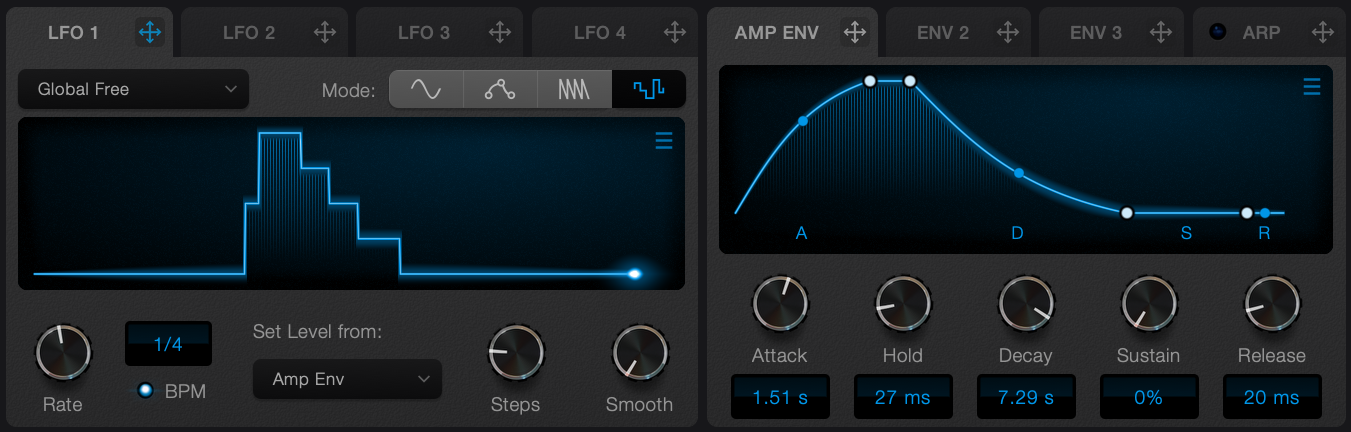
The result when the LFO level is set from the Amp Envelope, and the LFO set to have 5 vertical steps.