Sampler Oscillator
Using a Sampler Osc
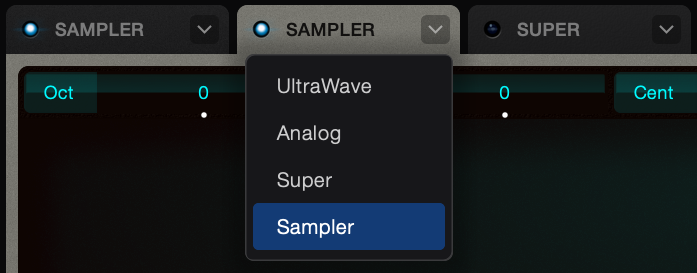
You can load up to 3 Sampler oscs in an Ultra Patch. Click the small arrows on the first 3 Osc tabs and select Sampler.
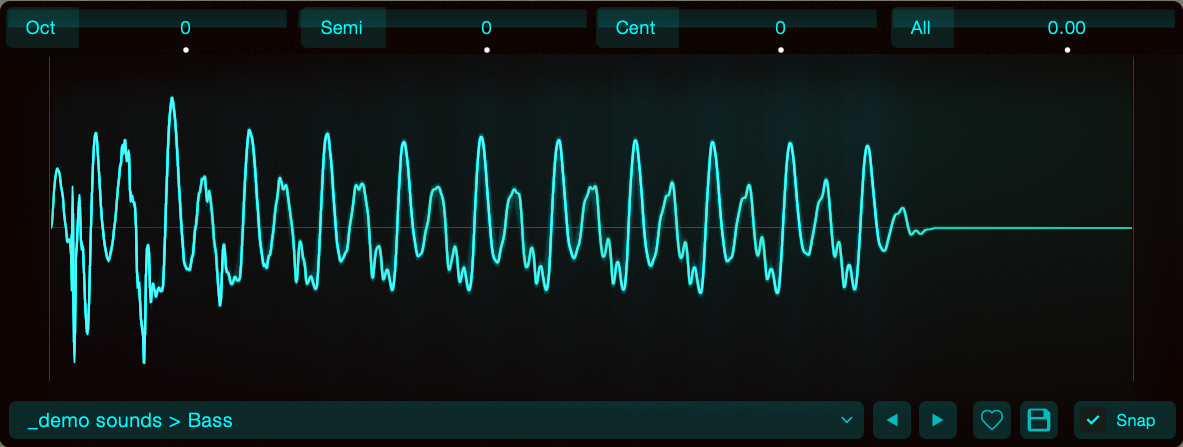
By Default, no sample is loaded to the Osc.
Samples can be loaded by dragging files to the screen from your file browser, or by clicking the menu at the bottom of the Sampler screen.
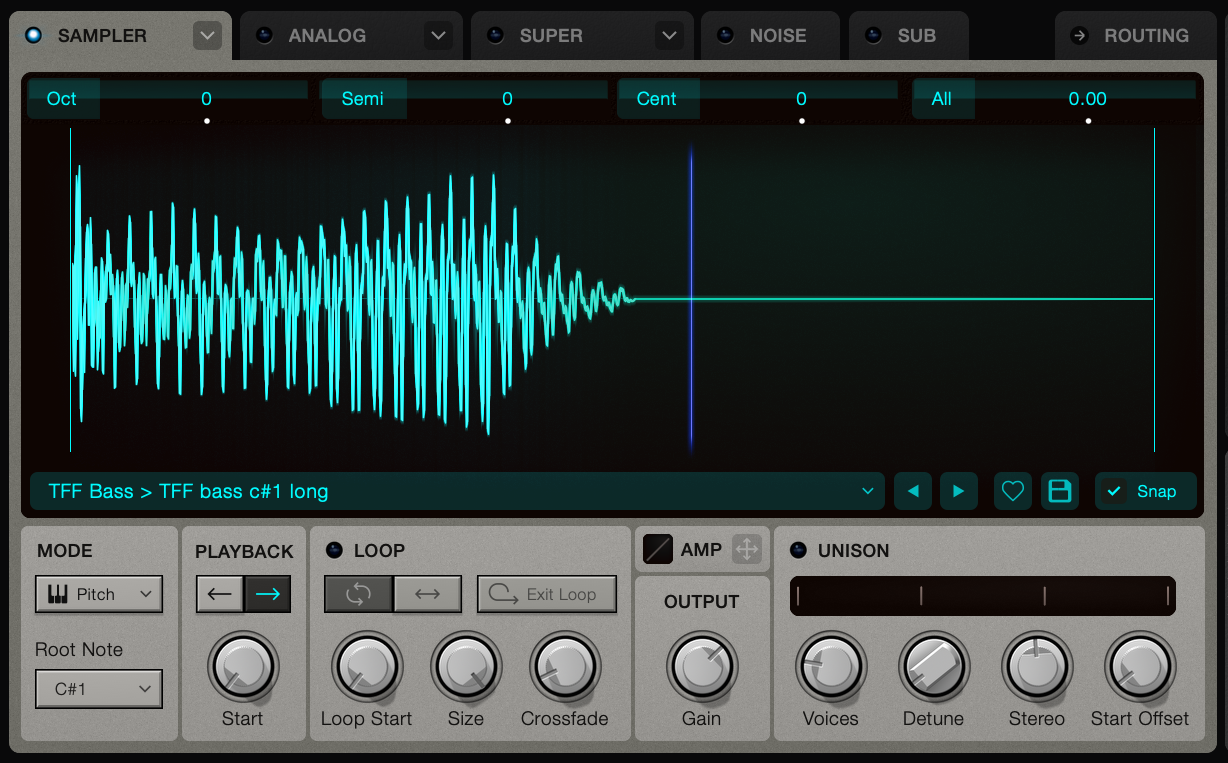
Sampler Screen
- Pitch controls
The 4 controls at the top of the screen affect the overall pitch of the Oscillator. The values will be preserved even if you change the Osc type to UltraWave or Super modes.
Drag vertically to adjust the Osc pitch. Modulate the pitch by dragging mod sources to a pitch control. - Zooming
You can zoom into the sample using the mouse wheel.
Sample Start, End and Loop Points
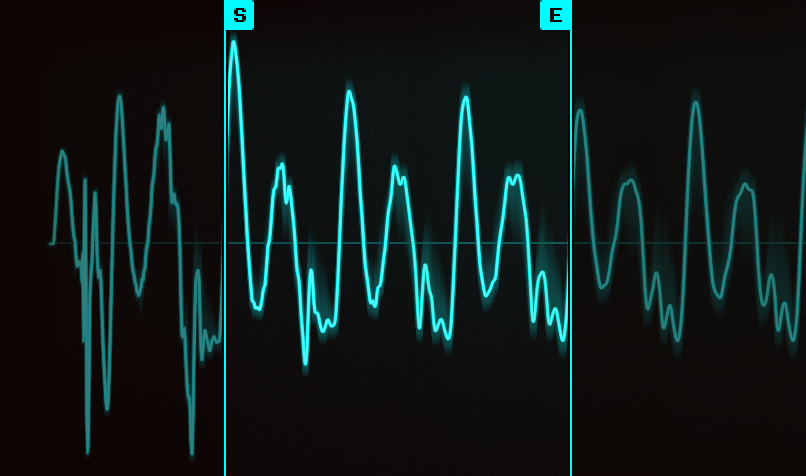
The screen contains handles that can be dragged to adjust various parameters.
Hover your mouse on the screen to show the handles.
- Start and End Handles
The S and E handles represent the playback start and end limits. Adjusting these will restrict the length of the sample. These parameters are a way to control what the definition of the sample and are not auto-matable.
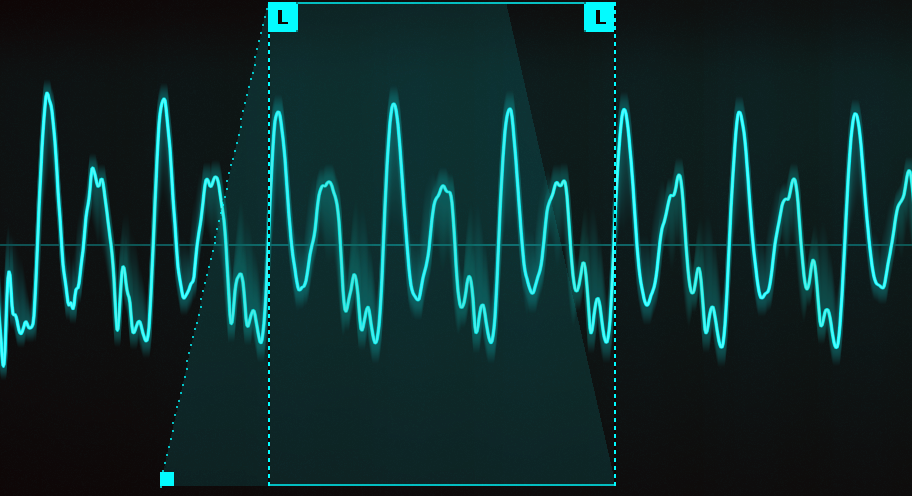
- Loop Box
If looping is enabled, the loop area is represented by a box. You can drag the box to move it. - Loop handles
The L handles control the loop start and end positions. These values are connected to the Loop start and size knobs, and as such, can be automated and modulated. - Loop Crossfade Handle
The small square at the bottom left of the loop controls the loop crossfade parameter.
Sample Menu Bar

- The main bar
This bar launches the sample menu. If a sample is loaded, it shows the folder or category and name of the currently loaded sample. - Left and right arrow buttons
load the next or previous sample from the current folder.

- Like Button
The small heart lets you add the sample to your favourites, making it available that category of the sample menu. - Save Button
Saves settings on the currently loaded sample. This includes the loop points, start and end markers, category and name. These will become the default values when loading the sample from the menu. Saving the sample info does not alter the sample file on disk. - Snap Button
When enabled, dragging the handles on the screen will snap to zero crossings.
The Sample Menu
Click the bottom of the sample screen to launch this menu.
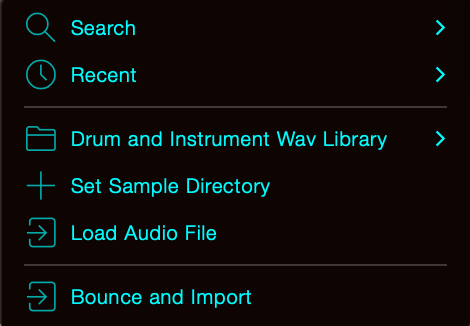
- Search
Type in keywords to search the Ultra Sample library or your local sample folder. - Recent
Contains a list of the samples you've loaded recently - Set Sample Directory
In the menu, you can select a folder on your local hard drive as your sample folder. The folder will be scanned to allow for fast searching of samples.
Once the folder has been selected, you can navigate the sub folders and samples directly from the menu. - Load Audio File
This option launches a browser where you can select any file on your computer, even if it is not located in your Sample Folder. - Bounce and Import
This option lets you export the currently loaded patch as a sample, and import it into the sampler Osc. This could be useful if you wanted to create a sample of the UltraWave, Analog or Super Oscs, complete with effects. This is similar to the bounce-in-place functions of your DAW.
Sampler Controls
Playback Modes
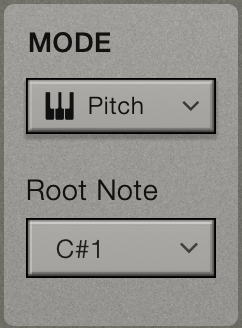
There are 3 playback modes:
- Pitch
The sample will have it's pitch adjusted to match the MIDI note you play. - Tempo
The sample will adjusts it's pitch so that it fits one bar. This mode is useful for drum loops. - Basic
The sample will play at it's original pitch - Root Note
In Pitch and Basic modes, the root note is the key that will playback the sample at it's original speed and pitch. If the sample was not playing the note C4, you will want to click this button and change the root note. See below for more details.
Note that you can also use the main pitch controls to further adjust the pitch (change the octave etc).
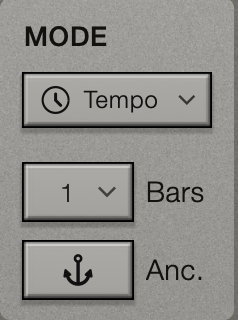
In Tempo mode, the following controls are visible:
- Bars
The sample will adjusts it's pitch so that it fits one bar. You can change this so that it will fit to 2 bars, half a bar etc. - Anchored
When activated, the start position of the sample is linked to the DAW playback position. So if you play a note a quarter of the way through the bar, the sample will start at 1/4 of the way through.
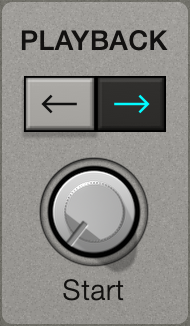
- Playback Direction
The arrows control whether the sample plays forwards or in reverse. - Start Knob
Adjusts where the sample playback starts. The control operates between the Start and End markers, if any have been set.
Looping
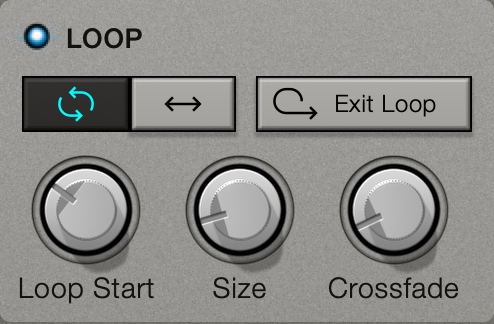
- Loop Enabled Switch
If enabled, the loop area will show on the screen. The playhead will stay within the loop area.
If disabled, playback stops when reaching the end of the sample. This is one-shot mode. - Exit Loop Switch
If enabled, the playhead will stay in the loop while a note is held, and then exit the loop once you release the note. - Loop Start Knob
Controls the start position of the loop. For more fine grained control, you can drag the loop start marker on the screen. - Size Knob
Controls the length of the loop. For more fine grained control, you can drag the loop end marker on the screen. - Crossfade Knob
Controls the loop crossfade amount. Crossfade can smooth out a loop that sounds too jarring.
Amp Envelope Mod Source
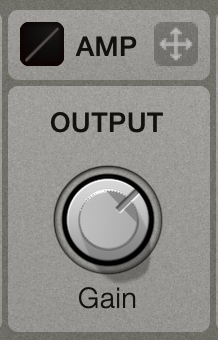
- Amp Mod Source
This mod source follows the level of the sample. Think of it as an envelope follower. Try dragging it to filter cutoff to create an auto filter effect. - Gain Knob
Use this to increase the makeup gain of quiet samples. - Mod curve graph
The small square graph can be used to launch a popover where you can adjust the mod curve.

The Mod Curve popover can be used to adjust the response of the Sample Amp mod source.
On the left are handles to adjust the curve. On the right is a history of the mod source value over time.
In the example above, the curve has been adjusted to increase the output for a quiet sample.
Unison
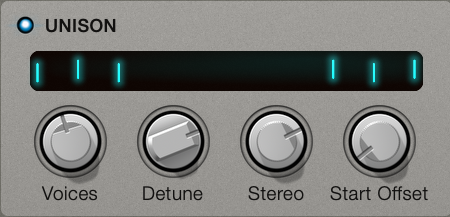
- Unison Enabled Switch
When enabled, playing a note will trigger multiple copies of the sample to be played back at various pitches. Each copy or voice will have it's own pitch and playhead position. This creates a thick choir effect. This is similar to the Super Osc. - Voices Knob
Controls how many copies / layers of the sample will play back. - Detune Knob
Controls how out of tune the voices are. - Stereo Knob
Controls the pan placement of the individual voices - Start Offset Knob
Randomises the start position of each voice. If set to 0%, the Voices all start at the beginning, which can create a lazer like sound. Increase this value to reduce this effect.
Root Note selector
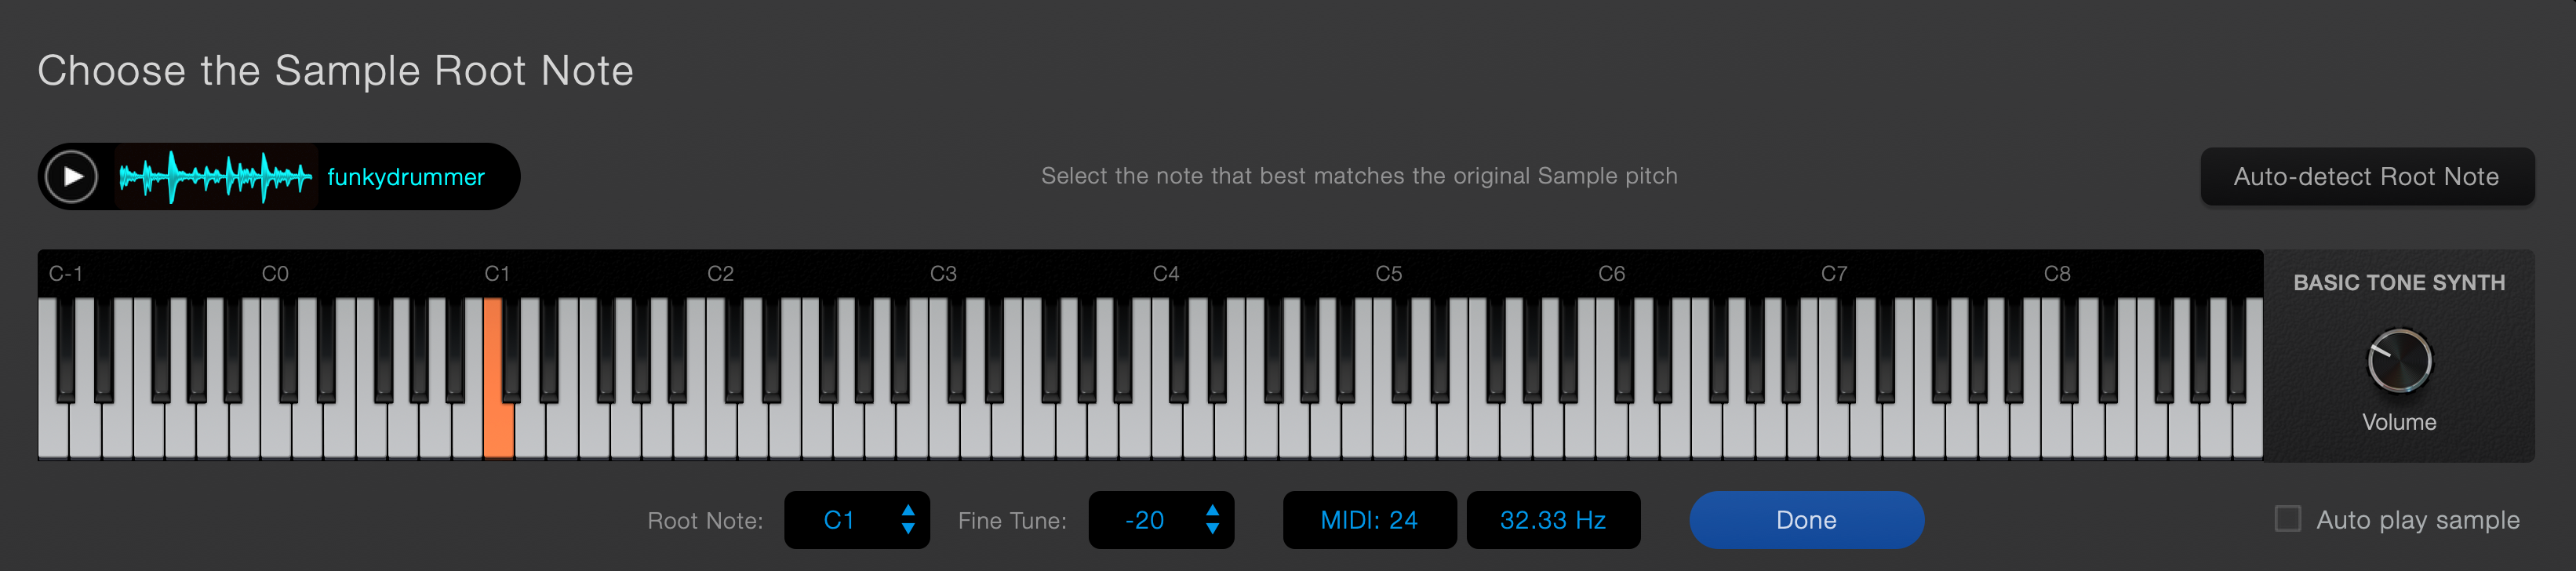
Clicking the Root Note button launches this popover control.
The idea is to find the original playback pitch of the sample, and select the note that best matches this pitch.
To assist you in this task, playing the keyboard will play a simple tone at the selected pitch. Try to match the tone to the sample.
You can adjust the volume of the tone with the control on the right.
You may find that playing the sample back at the same time as the tone makes it easier to head when it is right. If so, choose the Auto play sample option.
- Auto-detect Root Note button
For pitched sounds, it may be advisable to try this first.