Automatic Import 2: Settings
Step 1 - Choose regions
Step 2 - Import Settings
Automatic Import Settings

This page allows you to adjust the import settings which control how your wav file is imported into the ULTRA engine as an UltraWave.
You can play the imported sound with your MIDI keyboard, and compare it to the original wav.
Basic Vs. Advanced Modes
There are two modes to this page - basic and advanced.
- Basic mode
Choose an import preset, which applies a number of settings and imports the sound. You can choose different presets to see how they compare. By default the page will launch in basic mode. - Advanced mode
This mode shows all of the controls available, to give you fine tuned control of the import.
Source Waveform

The waveform at the top of the page shows the original source audio.
- Attack section
The green box shows the attack transient sample, if one has been detected or selected. - Wavetable cycles
The blue boxes show the automatically selected cycles that make up the wavetable / body section of the UltraWave.
You can click a cycle area to add or remove it from the wavetable. - Tail noise threshold
The red line indicates the tail section of the wave.
This can be adjusted using the tail noise threshold slider.
Cycles in the tail usually contain noise, and are not great candidates to be used as wavetable cycles. - Zoom controls
You can zoom in and out of the waveform, horizontally or vertically, by clicking the zoom buttons or using your mouse wheel - Auto Zoom
When the page loads a new sound, the graph will zoom to the extents of the source wave. You can disable this by de-selecting the auto zoom button. This is sometimes useful if you have zoomed in to look at the attack section, and want to keep this zoom when loading subsequent sounds. - Left / Right channel buttons
If your source sound is stereo, you may wish to import only the left or right channel. Use these buttons to de-select the unwanted channel. - Clear Cycles
Removes all blue wavetable cycles in the selected area of the graph - Trim Sound
Runs the import again, using the selected area as the region to import.
Engine waveform

Whatever attack or wavetable cycles that have been chosen combine to create an UltraWave. The graph at the bottom of the page shows the resulting UltraWave after the import has been completed.
The middle row of controls

Left section
- Play original & Play Engine buttons use these buttons to compare the original wav and the UltraWave in the engine
- Root Note this dropdown shows the note of the source waveform. Adjusting this parameter will re-run the import for the current wave. If the note is wrong, the import will usually fail spectacularly! This can happen with very high frequency sounds. You can tell this has happened when the cycles in the source graph look to contain more than one waveform.
- Edit root note button clicking the pencil button will enter a mode where you can set the root note by dragging a region on the screen.

Import Settings
This dropdown lets you choose an import preset. This will apply a number of settings to the sound. There are 5 presets:
- Variable Pitch
For Sounds with one sustained note, including pitch bends - vocals, phrases - Multi Pitch
For sounds that have gaps or noise in between multiple notes - Single Pitch - Simple
For sounds with consistent repeating waveforms - basses, analog synths - Single Pitch - Complex
For sounds that have complex cycles that don’t blend together easily - pianos, reverbed sounds, chiors - Kick Drum
Imports kick drums easily

Attack Section
Shows the attack sample that was detected during the import, if any. Disable this to have the beginning of the sound created using wavetable cycles only.
Pitch Curve
Controls the playback pitch during the wavetable. In Single pitch modes, this is disabled. You can choose to enable or disable the curve in any of the preset modes.
Amp Curve
Controls the volume of cycles during the wavetable. Turn it off if you want all cycles to play at maximum volume.
Advanced mode controls
Switching to advanced mode will reveal more controls in the middle row of controls.

Cycles Grid
Using the detected root note, the import will break the source materials into a gird of cycles. Those cycles are then analysed and the import will chose whether to add them as wavetable cycles or not.
The grid is created using one of four detection modes:
- Steady pitch
Good for sounds where the pitch doesn't change. Cycles that don't have a similar pitch to the root note, will not be eligible to become wavetable cycles - Variable pitch
Good for sounds where the pitch changes - vocal phrases with multiple notes, etc. - Multi pitch
Similar to variable pitch, except that it is designed for sounds where there are gaps or noise between notes. - No pitch mode
In this mode, the cycle grid is created at every zero crossing. This mode is best for kick drums.
Experiment with the modes and see which one is best for the sound you are importing.

Body Cycles Section
This section controls how wavetable cycles are selected from the cycle grid.
- Adaptive
This mode chooses cycles based on which ones will make the UltraWave sound most like the source material. It will add as many cycles as it needs to, up to the max cycles limit. - Loudest cycles
This mode chooses the cycles with the loudest peak values in the graph. - Evenly spaced
This mode will choose cycles evenly over time. - Max Cycles
Controls how many wavetable cycles can be created. - Tail noise threshold slider
Cycles in the tail usually contain noise, and are not great candidates to be used as wavetable cycles. Adjust this slider to exclude the tail cycles from the wavetable. Adjusting the slider will re-run the import.

Attack Section
An UltraWave can contain an optional attack transient sample. This section controls the automatic creation of that sample.
- Attack enabled switch
Toggle this switch to select whether attack samples are automatically created. - Manual Attack mode button
Clicking the pencil icon will launch a mode where you can select an area on the source waveform screen, and set this to become your attack sample. - Attack threshold knob
The attack ends when two wavetable cycles match each other in a reasonable manner. This knob controls how much they have to match and therefore where the attack ends. Reducing this control makes the attack shorter.

Pitch & Amp Curve Sections
An UltraWave can store pitch and amp information in addition to wavetable cycles. This information controls the pitch or volume of the cycles as they play back over time.
The pitch and amp curves are detected and created using the cycle grid.
For the chosen root note, a single cycle has specific length. For instance, then note A4 is 440 Hz, which is around 100 samples in length.
Cycles that are longer than the root note are lower pitch and cycles that are shorter are higher pitch.
Changing the cycle grid algorithm or the root note will re-run the import and create a new pitch curve.
Amp curve points are created using the volume of each cycle.
- Smooth button
Clicking this button smooths the curve. It can be pressed multiple times. - Reset button
Clicking reset will restore the original pitch or amp curve.
Further fine-tuning can be done once the UltraWave import is complete, using the sound edit pages.
Importing Multiple Sounds

File list
If you have chosen to import multiple sounds, the left side of the page shows a list of those sounds.
- Adjust the settings for the 1st sound, and click next
- The 2nd sound will load, with the same settings applied
- Make further adjustments and continue with the rest of the sounds
- You can click the file name on the left list to jump back to that sound for further editing
- Ticking the process all files checkbox and then clicking next will apply the current settings to the rest of the files.
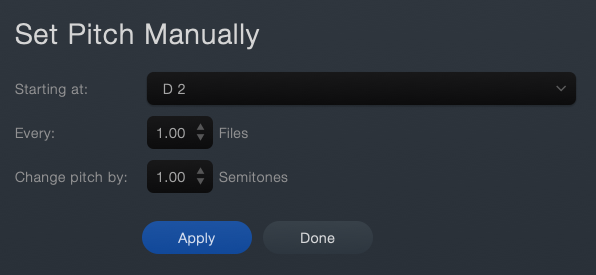
Set Pitch Rules button
The import will detect the root pitch of each sound, and base the decisions around creating Wavetable cycles on this pitch.
Sometimes the detected pitch is not correct. If your sounds have a consistent pattern (you might be loading 2 samples per octave) you can use this button to set and apply rules which hard code the detected pitch for each sound.
Next Steps
If your UltraWave has more than one sound, you’ll be taken to the Multiple Files page
Otherwise the import is complete and you are taken back to the main synth page.